

So, in this tutorial we will look at ways we can configure SSH to be more secure than it regularly is. This tutorial will not bring new stuff to the table, but rather collect other tutorials and will try to have some explanations made of the actions you are doing rather than just typing commands. We’ll see how to get your Secure Shell really Secure.
SSH and Known Hosts – Built-In Hardening
In your ‘.ssh’ folder you have a little file named ‘known_hosts’. This file contains a list of hosts which you have connected to before. Once you connect to a new host, SSH assumes you are in a secure channel and prompts you if the MD5 sum of the public key of the server you are connecting to, is of the real public key. You should very the key before typing ‘yes’ or at least make sure that you are on a secure channel. This will prevent man in the middle attackers to replace the key of the server without you noticing it. If next time your machine connects to the server using SSH and the public key has changed, you will be prompted to verify the new key.
SSH & 2-Factor Authentication
Thanks to Google, we are now able to have easy to create two factor authentication over SSH. Two factor authentication basically implies that your authentication does not relay on your password only but you also use another method to confirm your identity. Usually, it is named ‘Something you know and something you have’ rather then ‘Something you know’. It can be a retina scan, finger print, smart card and many other things. In this case, we are talking about a seed. We have an algorithm which takes a seed number and computes that with the current time stamp to create a 6 digits number. This number will be regenerated every 30 seconds meaning that even if an eavesdropper gets a hold of our password, he/she will still need the token.
We’ll start by installing the Google Authentication library with:
sudo apt-get install libpam-google-authenticator
Now let’s create that original seed by running:
google-authenticator
After you ran the google-authenticator you have your new key generated for you. Keep your scratch codes and the seed codes! Preferably, screen shot the QR code as well. You can do that in Ubuntu very easily with Shift+PrntScrn and crop the region you want. The output should look something like this:
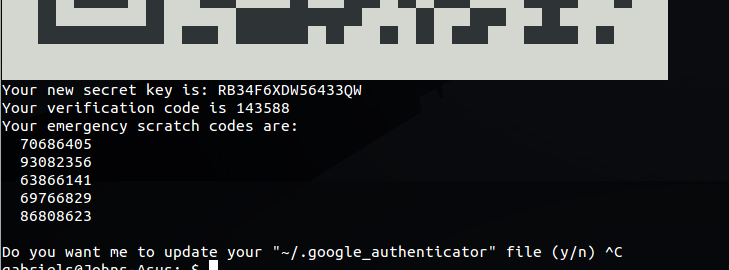
Download the Google Authenticator app to your phone and install it. Use the QR scanner to scan the code and input it into your Google Authenticator App.
Now we’ll add the configurations required to instruct the OpenSSH server to use Google Authenticator:
 sudo echo 'auth required pam_google_authenticator.so' >> /etc/pam.d/sshd

sudo nano /etc/ssh/sshd_config
Look for the line ‘ChallengeResponseAuthentication’ and change it to ‘ChallengeResponseAuthentication yes’. Ctrl+X to save and exit.
sudo service ssh restart
Will restart the service and you’re all set to go. A little tip – you might want to configure the Authentication Code request prior to the password prompt to block those annoying brute force attacks. This way, an attacker will have to ‘crack’ the authentication code before being able to try passwords and as we said, authentication code’s life span is 30 seconds.
SSH Key Authentication
Okay, so we mentioned earlier that when connecting to an SSH server, our client tries to confirm a finger print of the host’s public key. So why not make it the other way around? Another cool thing we can do, if configure the SSH Server (not the client!) to keep a copy of the client’s public key, and use it to authenticate the user. It can be done as a stand-alone authentication (no password or Authentication Code) and it can be done with all of the other things as well, making this a 2-Factor authentication with 3 stages. The great thing about key authentication, is that it is done completely automatically. Unlike the password of the authentication code that you need to input to the server, this will be sent automatically anyway so why not use it as well?
In case you do not have an SSH key, you can use the following command to generate your keys:
ssh-keygen -t rsa
Now, your private key is located at ‘~/.ssh/id_rsa’ and your public key is locates at ‘~/.ssh/id_rsa.pub’ unless you have chosen another path during the key creation process. In order to copy your brand new keys to the server, the nice open source community have created a littile piece of program for you. By running:
ssh-copy-id -i ~/.ssh/id_rsa.pub username@remotehost
Change the ‘username’ and the ‘remotehost’ to the correct information and complete the login. This will copy your public key to the server. Now to tell the SSH server to also authenticate using the public key, go to the server and open the configurations file with nano using the following command:
sudo nano /etc/ssh/sshd_config
Look for the line saying ‘PubkeyAuthentication’ and change it to ‘PubkeyAuthentication yes’. Do not change the ‘PasswordAuthentication’ line to ‘no’ as most tutorials recommend. That will instruct the SSH server not to prompt the user for a password while authenticating a client.
Ooh, and if you’re already there, how about editing your SSH banner (after login) using
sudo nano /etc/motd
Now Go and enjoy your SSH server, secure in the knowledge that you really need to mess things up to let someone access your SSH service ![]()
About The Author |
||
 |
Yuval Nativ |
|
| Yuval (tisf) Nativ is the manager of the Cyber Assualt Division of See-Security Technologies. As part of his job he is the manager of the Hacking Defined Experts program, a penetration tester, security researcher and developer. If you like to find him in our offices, just ask where Moriarty is… | ||